WESTERN PRODUCER — Extending the life of clothes helps to reduce replacement costs during this time of inflation and increasing living costs.
“Much of the clothing we buy in the stores today is relatively inexpensive and so it’s easy to come by and replace. Instead of paying money to get it repaired, some people say, ‘I might as well just buy something new.’ That’s a mentality that really needs to shift,” says Rachel McQueen, a clothing and textiles scientist in the Faculty of Agricultural, Life and Environmental Science at the University of Alberta.
In a world of fast fashion, with a constant supply of cheap, plentiful clothing, “it’s all too easy for consumers to simply toss and replace garments that only need minor repairs,” says McQueen.
The wasteful cycle of buy, wear, tear and toss is not only expensive, it “is creating an environmental disaster,” said McQueen. “Textiles aren’t easily recyclable. Even natural fibres like wool and cotton can still cause problems in the environment if they end up in landfills or floating in the world’s oceans.”
McQueen is lead scientist for the university’s recent research on clothing repair.
It shows that people of both genders aged 18 to 24 were equally likely to have their clothing repaired for free and that men were more likely than women to use unpaid forms of repair.
“That likely means they’re relying on wives, mothers and grandmothers who have sewing skills, but at some point, that help will dry up,” McQueen says.
Women, particularly as they age, were the most likely to make their own fixes, and although men were the most likely to pay for repairs, uptake for paid help was low among both genders and all ages, according to an online survey of 512 North American consumers.
“Those findings pinpoint a need for anyone interested in sustainability to be more open to making or paying for repairs,” says McQueen.
Accidents happen, zipper pulls break and rips or snags occur. Try these ideas to solve the problem:
- To repair a zipper pull, use a key chain ring to replace the pull. If the pull is unusable look for a professional to replace it, such as a sewing machine store staff, tailor or dry cleaner.
- For rips and tears, sporty or whimsical appliques can be glued or ironed on to cover damage. Mending tape can be applied to the inside of the garment to stabilize the tear and prevent it from getting larger during laundry.
- For larger patches for knees and elbows, use an iron-on patch that is a similar or contrasting colour.
- Snags on sweaters and knits cause a pucker in the fabric and a thread may be hanging on the outside. Do not cut the thread because this will create a hole in the garment. Instead, try to smooth out the pucker and work the thread back into place. Another option is to use a crochet hook, or a bent toothpick, to pull the snag thread to the inside of the garment. If the snag thread is broken, pull the end to the inside, smooth the pucker and then try to tie the ends together or use a drop of fabric glue such as Fray Stop to prevent a hole from forming.
- Create a basic sewing repair kit that includes straight pins, a small ruler, small sharp scissors, a seam ripper, hand sewing needles, a variety of thread, a small crochet hook, pencil or chalk. Helpful additional items for the kit are fabric glue, iron-on mending tape and iron-on hemming web. An iron and white cotton pressing cloth are also useful. An old white hankie or the back of an old white T-shirt make good pressing cloths.
- Save spare buttons and yarn that are attached to a garment’s tag when purchased. Label these and store with the sewing kit for easy access when needed.
- Some sewing machine speciality stores offer sewing classes and access to sewing machines for mending or small sewing projects.
- Always read clothing labels before buying to identify the fabric content and recommended laundry methods. An easy way to reduce clothing costs is to avoid garments that require dry cleaning.
Hems on jeans, pants, skirts and dresses can all be shortened using a sewing machine or by a no-sew option that uses iron-on hemming tape.
Put on the pants with the shoes that will be worn with them. Ask someone to turn up the pants to the desired length and pin in place.
Carefully remove the pants and measure the amount that they need to be shortened, such as 1.5 inches. Divide this number in two, to give 3/4 of an inch.
The existing hem is not cut off. Rather, a tuck is created just above the top of the existing hem to shorten the pants. Note that the bottom of the existing hem is closest to the floor. Lay the pants on a flat surface and, using a small ruler, measure on the inside of the pants from the top of the existing hem up the 3/4 of an inch. Use a pencil or a piece of chalk to mark this spot. Continue measuring and mark all around the pant leg every two inches. Fold along the marks, pin in place and iron the fold using a damp pressing cloth. Stitching just above the edge of the original hem creates a tuck that will shorten the pants by the desired 1.5 inches.
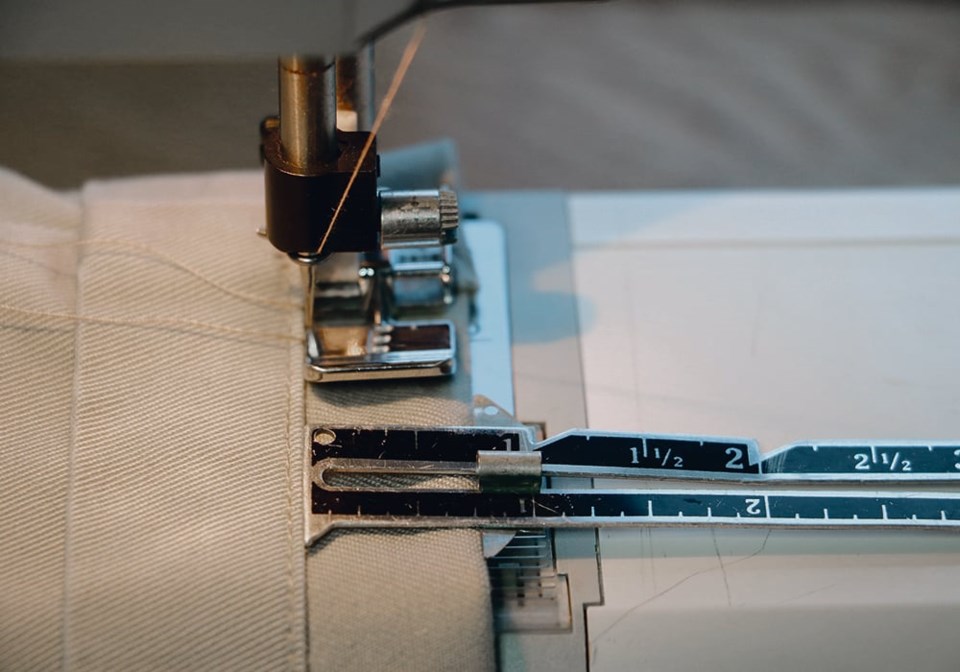
With the fold to the right of the sewing machine needle and the pants and existing hem to the left of the sewing machine needle, stitch as close as possible beside the top of the existing hem. A zipper foot and moving the needle to the left as much as possible will accomplish this.
Stitch up to the side seams, lift the needle and presser foot to pull the seam past the needle, lower the needle and presser foot on the other side of the side seam and continue sewing. This eliminates the battle of trying to sew through the thick side seams.
Press the pant leg so the fold is going up.
To shorten pants using iron-on hemming tape, measure, fold and press as above. With the pants right side out, measure the width of the hemming tape, cut the tape the amount turned up, in this case 3/4 of an inch. Place the tape on the right side of the fabric and right along the fold. Follow the directions on the hemming tape package and press in place. Remove the paper covering on the hemming tape and fold the material over it. Press again and leave until completely cooled.
With both types of hemming, turn the fold up inside the pant leg and tack at the side seams using a needle and thread and a few stitches or a little strip of iron on hemming tape to fasten the fold to the side seams.
Betty Ann Deobald is a home economist from Rosetown, Sask., and a member of Team Resources. Contact: [email protected].


