McKen is an experienced snow carver, having represented Saskatchewan in the Québec Winter Carnival in the mid-‘90s, took home first place in Prince Albert Winterfest and led snow carving workshops for Saskatoon and Eyebrow students.
“One year in Tugaske what I made was a slide, they had cleared the main street and made a big pile of snow,” McKen said.
“With shovels and a snow blower we shaped that into a general shape of a dragon and then used the carving tools to give it some of the finesse, the face, the fins, that sort of thing. People could slide right down the tail.”
That build, McKen estimates, took about 10 days, but said something eight feet high could be done in a weekend.
To start with, she said the carver will need plywood, a snow blower, a gardening spade as a flat carving tool, and a rasp if the carver wishes to put in finer detail.
McKen uses a homemade rasp with expanded mesh from construction attached to a 2x4 piece of wood that she described as “sort of like a nail file, when you run it across the floor it will give it a nice uniformed surface.”
The ideal temperature is -10°C to -15°C. If warmer, the snow becomes mushy; if colder the temperature becomes hard on the carver.
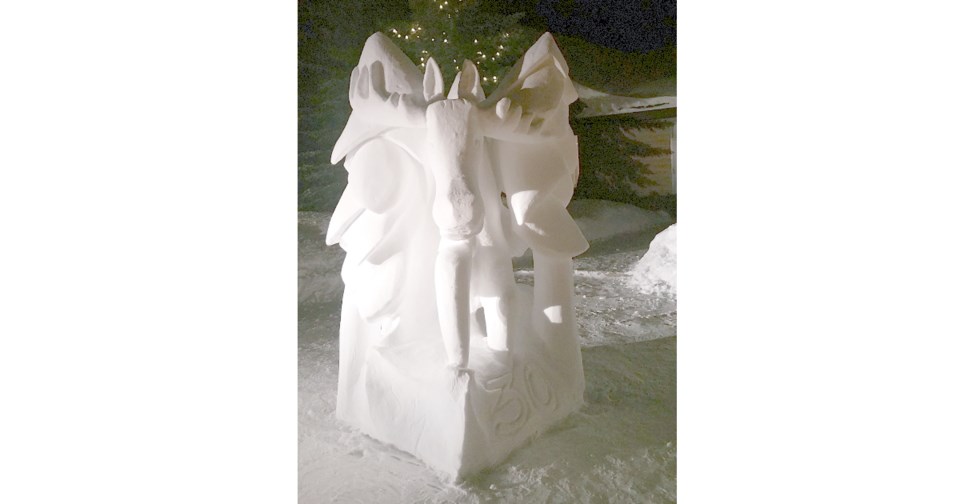
According to McKen, any sculpture, regardless of design, starts with building a plywood form similar to what is used for pouring concrete basements.
Once the plywood form is established, the wood will have snow blown into it with a snow blower so it creates a nice even snow form to set.
After the plywood forms are removed, you have a uniform block of snow, standing free. This is when the spade will come in, which the carver will use to rough out the general shape.
McKen warned that it’s important not to get caught up in a single corner and realize it doesn’t fit the rest of the shape.
“You’ll do some in one area and move around, almost draw the whole thing on the outside and slowly take away more material or add in different ways. Sometimes you can cut off a block and either shift to the side or lift it up on top and that will change your dimensions.”
As the details are whittled down, the carver will find themselves working with smaller tools, leading McKen to her wrasp. While bare hands aren’t her tool of choice, some carvers will use them or wool mittens to polish the surface.
Another aspect the carver will want to consider is colour, which can be done by spraying a bottle of water mixed with food colouring over the sculpture.
“If you’re doing snow carving using competition rules then you’re not adding any extra and you’re not using colour so it’s all about the snow you get in that contained space,” McKen said. “You can add colour if you’re not doing competition.”
Colour will impact the finer detail. McKen said when the carver isn’t using colour, highlighting shadows becomes important for a more intricate design, creating a smooth surface with sharp edges to create defined shapes.
For this she uses the rasp, eliminating any of the scoop-marks, creating a uniform surface. When she reaches the edge, she creates a straight even line so it’s one plain meeting up with the other plain.
“The shadows, it’s really going to be about those crisp lines. So if you want a shadow, make a nice crisp line and have it undercut. In Saskatchewan, we might get cold but we have that beautiful sunshine and that really gives you some stark lines on the white snow.”
For beginners, McKen said to think about it as being all about support. Snow is a heavy medium, and because of that carvers want to pick a design that isn’t top heavy like a palm tree would be or a moose standing up on spindly legs.
In one case, McKen created a moose surrounded by evergreen trees so the sculpture's form would have extra support.
“To do that moose it’s going to have the vegetation come in under the belly to support it.”
When the sculpture is done, the carver can consider lights. McKen said adding flood lights can accent the design in the evenings, especially if the carver went the route of highlighting shadows over colour.
“It’s a wonderful way to work large, to be able to try some different ideas. It’s very accessible… If you design big enough it turns into a community or team event.”


